I am super excited to see a new (to me) state as an Altus Handmade Flutes-sponsored guest artist of the Rhode Island Flute Extravaganza June 3, joining Andrea Fischer (Fluter Scooter) and Katy Dorrien in a day of workshops and performances in Cumberland. I've been charged with the duty of talking for one tiny hour about tone, breathing, and expression, which seemed an impossible task at first! But when you think about the linear development of any piece of music, from the basics of sound production to the final musical product, it makes sense. Here's what I'll be presenting, and if you're local, I hope to see you there! (PS--you're always welcome to use and adapt the materials I share here for your own purposes, and I appreciate your crediting me on any original material you reproduce of mine.)
Spoiler alert: there is a book coming. As soon as I can rub two minutes together to get something more accomplished on it!
Breathing, Tone, and Musicality: Developing the Whole Package!
Dr. Nicole Riner
Visiting Assistant Professor of Flute, University of Wyoming
Altus Performing Artist
www.nicoleriner.info
1. Breathing: You should fill up from the bottom, all the way up until you can’t find any more space to store air. Utilize those little pockets of space in your sides and back, too. Practice isolating different zones to ensure you are completely filling up. Online exercises: search “Breathing Gym” on You Tube.
2. Tone: Move the center of the lips forward as you go higher on the flute or to get quieter, while forming the syllable “ooooo” in your mouth. To go lower and/or get louder, open your mouth by putting more space between your back teeth and pointing the air, with the center of the lips, down into the hole, forming an “oh” or “ah” syllable in the mouth. Keep your corners flexible at all times. Don’t roll the flute inwards or outwards to achieve different octaves or pitches, but make your lips do it instead. Practice octave slurs, “diamonds”, and harmonics every day for maximum flexibility in addition to chromatic long tones.
3. Expression: A clear idea of where each phrase begins and ends, with one goal note per phrase in mind, is a good starting point. Then, let your dynamics, tone color, depth/speed of vibrato, etc. communicate that phrase shape. For example, by itself, this is a pretty boring passage:

But with some help from you, it can become quite meaningful:

Notice how the crescendos give a sense of climbing to these ascending arpeggios. Put a (*) over one goal note per phrase, indicated by a complete set of < >. Make sure that note is your sonic peak, in color, dynamic, and depth of vibrato. And what about?...

Accented phrases have a muscular feel, while staccato (and later slurred) phrases create a more playful counterpart, as if the soloist is alternating between a march and a light waltz. Be very thoughtful to consistently perform the dynamic and articulation that’s written.
Now it’s your turn: go back up to the first example and pencil in some of your own original markings. How will you clearly communicate them to your audience?
The following material is excerpted from my forthcoming Book, The Flutist’s Expression Workbook. Please contact me at nicole [dot] riner [at] gmail [dot] com to purchase a copy. All material on this hand-out is ©2017, Nicole Riner.
Spoiler alert: there is a book coming. As soon as I can rub two minutes together to get something more accomplished on it!
Breathing, Tone, and Musicality: Developing the Whole Package!
Dr. Nicole Riner
Visiting Assistant Professor of Flute, University of Wyoming
Altus Performing Artist
www.nicoleriner.info
1. Breathing: You should fill up from the bottom, all the way up until you can’t find any more space to store air. Utilize those little pockets of space in your sides and back, too. Practice isolating different zones to ensure you are completely filling up. Online exercises: search “Breathing Gym” on You Tube.
2. Tone: Move the center of the lips forward as you go higher on the flute or to get quieter, while forming the syllable “ooooo” in your mouth. To go lower and/or get louder, open your mouth by putting more space between your back teeth and pointing the air, with the center of the lips, down into the hole, forming an “oh” or “ah” syllable in the mouth. Keep your corners flexible at all times. Don’t roll the flute inwards or outwards to achieve different octaves or pitches, but make your lips do it instead. Practice octave slurs, “diamonds”, and harmonics every day for maximum flexibility in addition to chromatic long tones.
3. Expression: A clear idea of where each phrase begins and ends, with one goal note per phrase in mind, is a good starting point. Then, let your dynamics, tone color, depth/speed of vibrato, etc. communicate that phrase shape. For example, by itself, this is a pretty boring passage:

But with some help from you, it can become quite meaningful:

Notice how the crescendos give a sense of climbing to these ascending arpeggios. Put a (*) over one goal note per phrase, indicated by a complete set of < >. Make sure that note is your sonic peak, in color, dynamic, and depth of vibrato. And what about?...
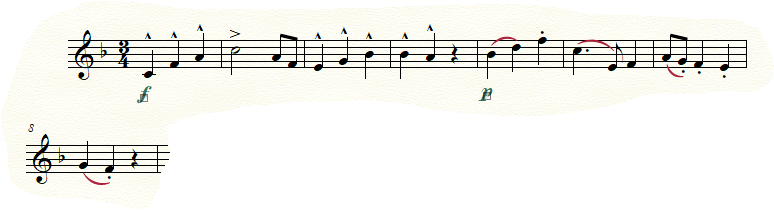
Accented phrases have a muscular feel, while staccato (and later slurred) phrases create a more playful counterpart, as if the soloist is alternating between a march and a light waltz. Be very thoughtful to consistently perform the dynamic and articulation that’s written.
Now it’s your turn: go back up to the first example and pencil in some of your own original markings. How will you clearly communicate them to your audience?
The following material is excerpted from my forthcoming Book, The Flutist’s Expression Workbook. Please contact me at nicole [dot] riner [at] gmail [dot] com to purchase a copy. All material on this hand-out is ©2017, Nicole Riner.
Comments
Post a Comment